Sunday, December 1, 2019
Finding the Last Logon - Cal Poly FAST CTF Challenge 14
Question: What was the timestamp when Patrick last logged off? FORMAT: M/DD/YYYY H:MM:SS
Points: 70
Download File from: https://github.com/mfput/CTF-Questions/raw/master/Security
Hint: No Hint
Answer: 4/10/2017 6:32:00
Like my work? Donate here: https://buymeacoffee.com/forensicnoobsecurity
Finding Interactive Logons - Windows Event Logs - Cal Poly FAST Challenge 13
Forensic Challenge 13:
Question: How many interactive logons were there on this machine?
Points: 100
Download File from: https://github.com/mfput/CTF-Questions/raw/master/Security
Hint: There are multiple types of logons.
Answer: 23
This is the first of three questions centered around the Windows Security event log. The file is an EVTX Windows event log from a Windows 7 machine. The extension has been removed, so you'll have to add the .evtx extension. You'd have to use the file command to figure out it is a event log file. I will be showing how to solve these 3 Windows event log questions with the native Event Viewer, of course you could also ingest the .evtx file into a supported program with better query functionality.
You can natively open this file with the Event Viewer. Once opened, it can be quiet overwhelming seeing all these logs. Of course, we are looking for something in particular, the number of interactive logins. Each event is group by a Windows event ID. The standard Windows event ID for account logins is 4624 "An Account was successfully logged on". We can filter the Windows event log by pressing the "Filter Current Log" on the right panel, and entering the 4624 event ID.

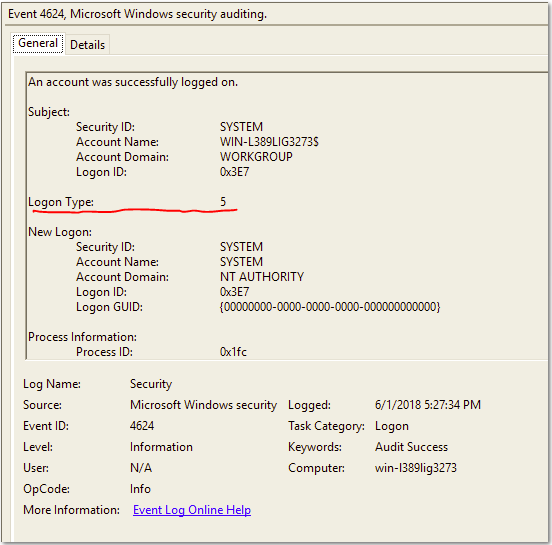
Once we have this log filtered, we can see that there 279 events from ID 4624. However, not all were an actual interactive login. When we select the individual event, we can see the details and see a field called "Logon Type":
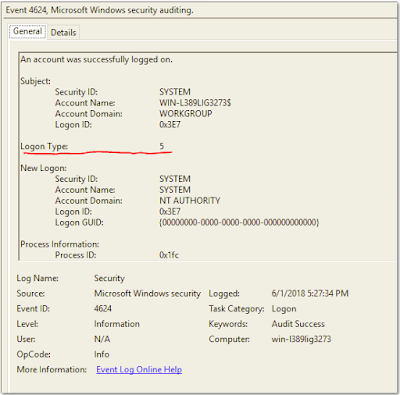
There are multiple types of logins, which we are only interested in one. In the above log we see a Logon Type of 5, which is a Service logon. We want to filter by type 2, interactive logons. Below is a list of the different logon types available:
Logon Type
Description
2 Interactive (logon at keyboard and screen of system) 3 Network (i.e. connection to shared folder on this computer from elsewhere on network) 4 Batch (i.e. scheduled task) 5 Service (Service startup) 7 Unlock (i.e. unnattended workstation with password protected screen saver) 8 NetworkCleartext (Logon with credentials sent in the clear text. Most often indicates a logon to IIS with "basic authentication") See this article for more information. 9 NewCredentials such as with RunAs or mapping a network drive with alternate credentials. This logon type does not seem to show up in any events. If you want to track users attempting to logon with alternate credentials see 4648. MS says "A caller cloned its current token and specified new credentials for outbound connections. The new logon session has the same local identity, but uses different credentials for other network connections." 10 RemoteInteractive (Terminal Services, Remote Desktop or Remote Assistance) 11 CachedInteractive (logon with cached domain credentials such as when logging on to a laptop when away from the network)
Source: https://www.ultimatewindowssecurity.com/securitylog/encyclopedia/event.aspx?eventID=4624
NOTE: Interactive logins can come from other Event IDs as well, but are not present in this event log.
We want to filter by the interactive logon type of 2. Alas, this isn't possible with the simple click of a button in the Event Viewer, but it is possible using XPath. All Windows event logs are written in XML, and each attribute is an XML entity which we can query. From a selected event log, we can choose "Details -> XML View". With this, we can see the Data Name which we will use to query, "LogonType".
 Go to the "Filter Current Log" on the right hand pane, switch to the XML tab, and press "Edit query manually". This will allow us to right custom XPath queries to gather more specific data. Because this is a saved log, the Path will be different from mine. After the Select Path asterisk, replace
[System[(EventID=4624)]] NOTE: This queries the Sytem entity for an Event ID of 4624.
with:
[EventData[Data[@Name='LogonType']='2']] NOTE: This queries the Event Data entity for a logon type of 2. The event Data is independent of the System entity, meaning if there are an other event IDs that have this event data, they will also appear.

With this, we can see that there were only 23 actual interactive logons in this event file.

Like my work? Donate here: https://buymeacoffee.com/forensicnoobsecurity

There are multiple types of logins, which we are only interested in one. In the above log we see a Logon Type of 5, which is a Service logon. We want to filter by type 2, interactive logons. Below is a list of the different logon types available:
Logon Type
|
Description
|
| 2 | Interactive (logon at keyboard and screen of system) |
| 3 | Network (i.e. connection to shared folder on this computer from elsewhere on network) |
| 4 | Batch (i.e. scheduled task) |
| 5 | Service (Service startup) |
| 7 | Unlock (i.e. unnattended workstation with password protected screen saver) |
| 8 | NetworkCleartext (Logon with credentials sent in the clear text. Most often indicates a logon to IIS with "basic authentication") See this article for more information. |
| 9 | NewCredentials such as with RunAs or mapping a network drive with alternate credentials. This logon type does not seem to show up in any events. If you want to track users attempting to logon with alternate credentials see 4648. MS says "A caller cloned its current token and specified new credentials for outbound connections. The new logon session has the same local identity, but uses different credentials for other network connections." |
| 10 | RemoteInteractive (Terminal Services, Remote Desktop or Remote Assistance) |
| 11 | CachedInteractive (logon with cached domain credentials such as when logging on to a laptop when away from the network) |
Source: https://www.ultimatewindowssecurity.com/securitylog/encyclopedia/event.aspx?eventID=4624
NOTE: Interactive logins can come from other Event IDs as well, but are not present in this event log.

[System[(EventID=4624)]] NOTE: This queries the Sytem entity for an Event ID of 4624.
with:
[EventData[Data[@Name='LogonType']='2']] NOTE: This queries the Event Data entity for a logon type of 2. The event Data is independent of the System entity, meaning if there are an other event IDs that have this event data, they will also appear.

With this, we can see that there were only 23 actual interactive logons in this event file.

Sunday, March 31, 2019
Recycle Bin Forensics: Cal Poly FAST CTF Challenge 12
File:
https://raw.githubusercontent.com/mfput/CTF-Questions/master/file12.zip
Question: When was the flag deleted? Format: "YYYY-MM-DD HH:MM:SS"
Hint: Utilizzare uno strumento chiamato rifiuti.
Answer: 2018-11-04 02:43:31
Question: When was the flag deleted? Format: "YYYY-MM-DD HH:MM:SS"
Hint: Utilizzare uno strumento chiamato rifiuti.
Answer: 2018-11-04 02:43:31
Here
we have a zipped folder. Upon unzipping the folder it looks empty. Of
course it is not, as the size of the zipped folder is over a kilobyte
big. If you have Windows Explorer set to view hidden files, you can
actually see the files inside of it while zipped.

Now
we don’t have a forensic image, so there won’t be any NTFS
artifacts to help you here. There are files inside this folder, and
as we learned earlier, some files have attributes that make them
hidden to Explorer. We can use the command “dir
/a” to view all
files in the directory. Inside the folder there is a directory with
the name of a user SID (Security Identifier). We can use the “attrib
filename”
command to view the attributes of that file.

Here
we can see that the S-1-5 directory has the “S” and “H”
attributes. These attributes denote “System” and “Hidden”.
We can remove these attributes with a minus sign to make this
directory appear normally in Windows Explorer. “attrib
-s -h filename”.

Now
the directory becomes visible to use once a gain. If we wanted to add
those attributes back, we would use “attrib
+s +h filename”
and the folder would become hidden again. To see a full list of
attributes, use “attrib
/?”. Now the
S-1-5 directory is empty. Or is it really? Upon further inspection
there are two files hidden in the directory: “desktop.ini” and
“INFO2”. The desktop.ini file is not relevant to finding the
flag. Using the attrib command we can see that INFO2 has the “A”,
“S”, and “H” attributes (A is for archived). Similar to
before, we will make this file visible to Explorer with the attrib
command “attrib
-s -h INFO2”.

When
opening the INFO2 file in a text editor, we can see the flag, but the
data isn’t being parsed right. We can’t tell when it was actually
deleted with this method.

This
is where our hint comes in handy. “Utilizzare uno strumento
chiamato rifiuti” is Italian and roughly translates to “Use the
tool called trash”. Trash is not a tool that can help you, but
rifiuti can. Rifiuti is a Windows forensic tool used for Recycle Bin
forensics. An INFO2 file is actually a log of the pointers of files
that are sent to the Recycle Bin. You can download Rifiuti2 (improved
version of the original tool) here:
https://abelcheung.github.io/rifiuti2/.
Use the normal rifiuti.exe and not rifiuti-vista.exe against the
INFO2 file. “rifiuti.exe
INFO2”.

With
the data now parsed correctly, the flag.rtf file was deleted with a
timestamp of “2018-11-04 02:43:31”. Rifiuti2 tells us the name of
the deleted files, if they were emptied or not, the size on disk and
the path.
INFO2
files are located at “C:\Recycled\INFO2”
for Windows 95/98/ME and “C:\Recycler\SID*\INFO2”
for Windows NT/2000/XP. Initially there was one INFO2 file the
machine. With NT, 2000, and XP, there exists an INFO2 file for each
user, located in the SID folder belonging to that user. This way, it
is possible to tell which user sent the file to the recycle bin.
Starting
with Windows Vista, INFO2 files were replaced by $I files located at
“C:\$Recycle.Bin\SID*\$I*”.
You can use the “rifiuti-vista.exe” to parse $I files. Supposedly
EnCase and FTK should also support parsing INFO2 files.
Like my work? Donate here: https://buymeacoffee.com/forensicnoobsecurity
That
concludes the 12 questions for the FAST CTF! I am sure you learned
something new and the skills you learned will help your endeavors
into the future.
Bit Shifting: Cal Poly FAST CTF Challenge 11
File:
https://raw.githubusercontent.com/mfput/CTF-Questions/master/file11.txt
Question: Find the flag in this text document!
Hint: If you are having trouble with this bit, shift your focus.
Answer: fastctf{a_bit_tricky}
Question: Find the flag in this text document!
Hint: If you are having trouble with this bit, shift your focus.
Answer: fastctf{a_bit_tricky}
In
this challenge we are given a text file with some scrambled data.

The
file is definitely a text file. However we can’t make any sense of
it looking at it in a text editor. We need to use a hex editor to
look for more clues.
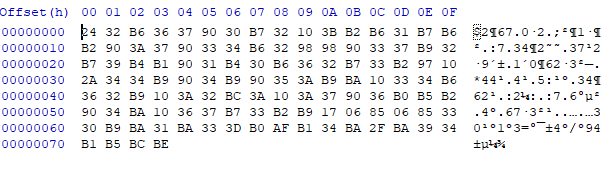
Even
in a hex editor is still looks like gobbledygook. Without any hints,
this was a hard challenge. The hint states “If you are having
trouble with this bit, shift your focus.” I use far too many puns
with my hints, at least I have fun with them. Bit-Shifting involves
shifting every bit in the file. We can do this with a hex editor
called WinHex from X-Ways forensics (http://www.winhex.com/winhex/).
By
shifting the bits to the left once, the file is displayed normally.


Please Don't Double Click Batch Files: Cal Poly FAST CTF Challenge 10
Question:
The flag is inside this Windows Batch file.
Hint:
Strings is faster than restarting your computer.
Answer:
fastctf{editnotopen}
This
challenge was very easy. All you had to do was read the batch file.
Now if the batch file was executed, it would have shutdown your
computer in 5 seconds and caused a pop-up to say “You’re in CIS
and you execute random batch scripts?”.

Obviously
this is quite malicious and hilarious. Don’t execute batch scripts
without inspecting them first! Using any text editor will show the
flag fastctf{editnotopen}. You could have also used strings on the
file. The “::” represents a comment and is not shown when
executed.
Like my work? Donate here: https://buymeacoffee.com/forensicnoobsecurity
MD5 collisions: Cal Poly FAST CTF Challenge 9
Question:
What is the name of the executable with the MD5 hash of
cdc47d670159eef60916ca03a9d4a007 that performs a malicious task?
(Don't worry none of these will actually harm your computer).
No
Hint.
Answer:
15832-3645-24173.exe
This
question sounded easy but turned out to be a bit trickier. You are
given the MD5 hash of a file and then asked to give the name of the
file. No hints are given since it is so straight forward. Or is it
really?
Inside
the zipped archive is a large collection of randomly named files of
equal size.

In
Linux you can find the MD5 hash of all the files in the directory by
using “md5sum
*”. MD5sum is a
handy tool that calculates MD5 hashes. You can also get if for
Windows from the win-bash project
(https://sourceforge.net/projects/win-bash/).

After
running the command, you may notice something peculiar, every file in
the directory has the same MD5 hash. Are they all the same file? No.
One of these files is different, and this phenomenon is known as an
MD5 hash collision. So how can we go about figuring out which file is
the one we need? If you were to run the files from the command
prompt, you would eventually figure it out but that method is
impractical.

One
of these files is supposed to be harmful to our computer. If we know
that many of these files are identical, then calculating a hash will
tell use which file is different. This time, we will calculate each
file’s SHA1 hash. It is very, very unlikely that the odd file will
have an identical MD5 and SHA1 hash value as the other files. In
Linux, we can calculate the SHA1 hashes with “sha1sum
*”.

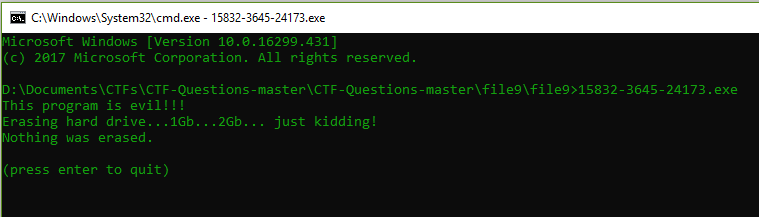
15832-3645-24173.exe
sticks out like a sore thumb with its different SHA1 sum. Running it
in the command it pretends to erase your hard drive.
You
could have also used strings on all the files in the directory and
eventually found which was different.
These
files were created with a tool called Evilize, which generates MD5
hash collisions between similar C programs. To understand more about
why this happens and to download Evilize, check out
https://www.mscs.dal.ca/~selinger/md5collision/.
Like my work? Donate here: https://buymeacoffee.com/forensicnoobsecurity
LNK Forensics: Cal Poly FAST CTF Challenge 8
Question:
What is the MAC address of the computer these files originated from?
(Hex in lower case)
Hint:
One of these files is the missing lnk to your answer.
Answer:
d0:50:99:82:33:6e
In
this challenge you were given a folder with random files I grabbed
from my computer. With these files, you should be able to deduce the
MAC address of my computer.

Only
one of these files is actually helpful to finding the answer. As the
hint hints, “One of these files is the missing lnk”. In Windows,
shortcut files contain a large amount of metadata of the original
file these link from, as well as the host computer. Magnet Forensics
has a short article explaining some information about LNK files here:
https://www.magnetforensics.com/computer-forensics/forensic-analysis-of-lnk-files/.
Exiftool is a great tool for find information and metadata about
files. Using Exiftool on “Ljones – Close.mp4” gives the
following results:
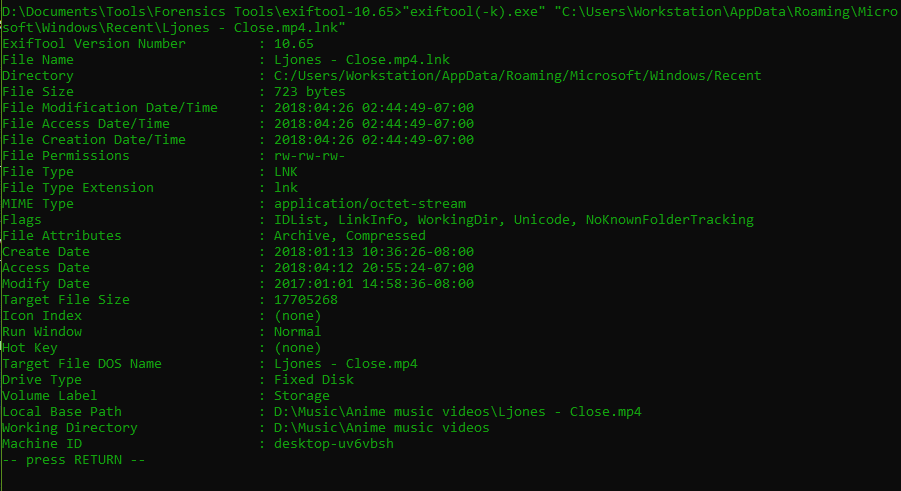
A
lot of information came from such a small file! We can see
interesting data such as Volume Label, Machine ID, Target File Size
and more. Unfortunately Exiftool did not find the MAC address.
Exiftool works best for finding Exif metadata. For the forensic
analysis of LNK files, Eric Zimmerman’s Link Explorer works great.
You download Link Explorer (LECmd) from
https://ericzimmerman.github.io/.
To
specify a file to examine, use the “f” flag:
LECmd.exe
-f “Ljones – Close.mp4.lnk”


This
displays a lot of additional information compared to Exiftool.
Scrolling down we can see in addition to the Machine ID that we found
earlier, we have discovered the MAC address: d0:50:99:82:33:6e. Next
time you do your forensic investigation, be sure to check out any
link files on Windows machines.
Like my work? Donate here: https://buymeacoffee.com/forensicnoobsecurity
Image Anti-Forensics: Cal Poly FAST CTF Challenge 7
Question:
The flag is in this image. What is it? Format: fastctf{flag}
Hint:
The magic is missing, don't believe the image now.
Answer:
fastctf{PNGesus}
In
this challenge, a given image file contains a flag and you must find
it in there. This leads to many possibilities. Is it stego? Is it
hiding in the strings? How is it in the image? These are good
questions to ask. Trying to open the image should give you message
from your image viewer saying it is unsupported.

So
this file format is not supported. What kind of file is this exactly?
This is where the “file” command comes to the rescue. You can use
the file command in Linux of Cygwin (a Linux emulator for Windows).
file
file7.jpeg

It
appears “file” has failed us, since it only recognizes it as
data. If this file is a JPEG, it should have some metadata that
Exiftool can see.

Exiftool
responds with very little useful information, other than stating
there is a file format error, which would explain why our picture
viewer failed to display the image. As with all CTF challenges, it is
always good to run the strings and binwalk commands. Our hint tell
us, “The magic is missing, don't believe the image now.”, and
from strings we find the string “what’s the magic number?”.

A
magic number is a binary sequence in the header of every file used to
identify the file. All files should include a magic number, and the
operating system examines this and the extension to determine the
file type. All JPEG files should start with the binary sequence “FF
D8 FF” since it is their magic number. Using a hex editor, we can
examine the header of the file and change it if we need to. HxD is a
free, simple, and easy to use Hex editor for Windows
(https://mh-nexus.de/en/hxd/).
Bless is an alternative hex editor for Linux. Opening file7.JPEG
reveals our issue.

The
magic number should be at the very start of the file, but instead all
we see are zeros. Someone has removed the header from this file,
which explains why the
file command could not identify it.
We can add “FF D8 FF” to the start of the file and it should
display properly. After editing the file and opening it, we see this:

Now
the image file will not open at all. Our extension and header both
match, so why is this happening? Let’s look back at our hint: “The
magic is missing, don't believe the image now.”. So the magic
number was missing, but it turns out that this not actually a JPEG
file at all. To determine the original format of the file can be
tricky if both the header and extension have been edited. Usually
checking strings is our best bet. However, it was stated both in the
question and hint that this was an image file. In that case we can
continue to try different headers and matched extensions until the
file opens properly. Common image formats include:
- FormatMagic NumberJPEG/JPGFF D8 FFPNG89 50 4E 47 0D 0A 1A 0AGIF47 49 46 38 37 61 or 47 49 46 38 39 61BMP42 4DTIFF49 49 2A 00
For
a list of magic numbers and associated file formats, check out:
https://en.wikipedia.org/wiki/List_of_file_signatures.
File7.JPEG
is actually a PNG image, and if we edit the header and extensions to
reflect that, the image will properly open.

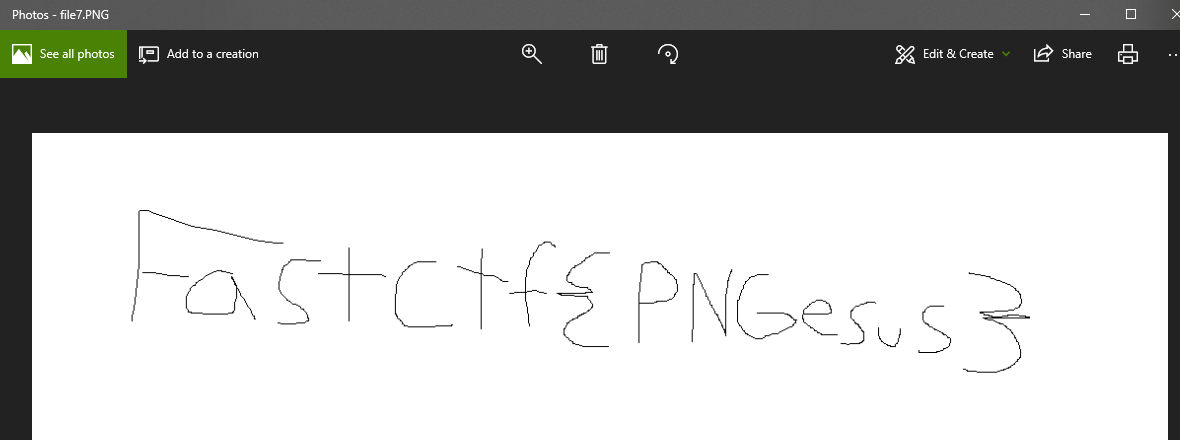
Now
we can see the flag is “fastctf{PNGesus}. In hindsight I may have
made this challenge a little too tricky. Beyond the magic number
there is still data chunks that you could have examined to determine
that it was a PNG file (“IHDR” is a critical first chunk, file
ends with “IEND” chunk). You can read more about the PNG file
structure here:
http://libpng.org/pub/png/spec/1.2/PNG-Structure.html.
Like my work? Donate here: https://buymeacoffee.com/forensicnoobsecurity
Detecting Timestomped Values: Cal Poly FAST CTF Challenge 6
Question:
What is the original modification time by the kernel of the document
"New Text Document.txt"? Format: YYYY-MM-DD HH:MM:SS.SSSSSS
Hint:
It appears this file has been time-stomped. AnalyzeMFT may be able to
help.
Answer:
2018-02-24 21:15:35:512585
Challenge
6 provided an E01 file to examine. You will need to download a
forensic tool like FTK of Autospy to view the data. I will be using
FTK for this demonstration. For this challenge, we want to know the
original modification time by the Windows kernel for the file “New
Text Document.txt”. Note the language used in this question. We
want to know the modification timestamps provided to file by the
kernel, not by the user. This challenge is more advanced, and expects
some knowledge of Windows timestamps and NTFS forensics.
When
we first open our E01 file we find that the text document is empty
and its timestamps are from January 1st,
1601. Either the timestamps have been manipulated, or I am a time
traveler. The timestamps have been set all the way back to the start
of the Gregorian calendar, which is the point in time where Windows
counts forward from.

This
file was altered with a tool called timestomp, which exists as a
metasploit module or as a standalone Windows executable. Timestomp
can alter all 4 timestamps in user-space. These 4 different
timestamps are collectively referred to as MACE
- Modified,
Accessed,
Created,
and Entry modified. Timestomp can not however edit timestamps given by the
Windows kernel (which should be identical to their user-space counter
parts). Ok, now that we know this, now what? Well we will only see
userspace timestamps by examining the file in Explorer and even FTK
is fooled. “I’m a Noob, I have no idea what I’m doing”. This
is why the hint is more of an instruction than a hint.
All
of the files starting with dollar signs are NTFS artifacts. The one
we are interested in is $MFT, the NTFS Master File Table. As our hint
stated, AnalyzeMFT may be able to help. AnalyzeMFT is a Python
program for parsing the $MFT. You can download AnalyzeMFT from https://github.com/dkovar/analyzeMFT
or install it using the pip package manager. Now the $MFT file must
be exported from FTK. You can do this by right-clicking and selecting
export.

Since
$MFT is a hidden system file, you won’t be able to see it
initially. From the directory you exported $MFT to, open a command
prompt and use the command:
attrib
-s -h $MFT
This
alters the attributes of the file to make it visible to us. Now we
will use AnalyzeMFT to export the data to a .csv file in an
Excel-friendly format:
analyzeMFT.py
-f $MFT -o MFT.csv -e
Once
exported we will have a MFT.csv file that we can easily examine.
Looking at “New Text Document.txt”, there are 8 timestamps
associated with it. The first 4 are the $SI (Standard Information
attribute) timestamps. These timestamps are modifiable in user-space.
The following 4 timestamps are the $FN (File Name attribute)
timestamps. These timestamps are given by the Windows Kernel and can
not be edited by timestomp.

The
$SI MACE timestamps associated with “New Text Document.txt”
display as an invalid timestamp. In blue I have highlighted the $FN
modification timestamp, which is our answer, 2018-02-24
21:15:35:512585.
For
someone who is unfamiliar with NTFS forensics, this can seem pretty
overwhelming. These resources can help you learn more:
NTFS
Basics: http://www.ntfs.com/ntfs_basics.htm
Timestomping
NTFS:
https://www.os3.nl/_media/2013-2014/courses/rp2/p48_presentation.pdf
Like my work? Donate here: https://buymeacoffee.com/forensicnoobsecurity
Buffer Overflows: Cal Poly FAST CTF Challenge 5
Question:
Here's a simple C program. What's the password? Format:
"fastctf{flag}"
Hint:
The C is so full, it's overflowing!
Answer:
fastctf{badcodefails}
This
challenge gives a simple C program and expects you to find that flag.
Running file5.exe asks for a password, and if supplied the wrong the
answer, quits.

Trying
to brute-force what the password is not the desired method, but it
can be done. Since the format of the flag is in curly brackets, you
can easily find the flag by searching through the strings of the
file. Strings are literal strings of ASCII or Unicode characters
inside files. There are many GUI and command line tools for finding
strings. I like to use BinText on Windows (https://bintext.soft32.com/).
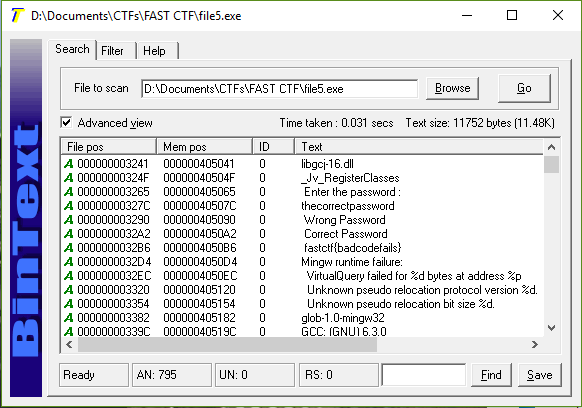
Not
only can we see the flag “fastctf{badcodefails}”, but we can also
see the correct password needed to display the flag was
“thecorrectpassword”. If you did not use strings to solve this
and instead looked at the hint “The C is so full, it's
overflowing!”, then you may have deduced this can actually be
solved via buffer-overflow. Below is what the C program looked like
before I compiled it with GCC.


In
the picture above, 65 characters are inserted and the flag is
printed. Now you learned a little something about buffer overflows!
Like my work? Donate here: https://buymeacoffee.com/forensicnoobsecurity
Sunday, March 10, 2019
Using Hashcat on 7zip Archives: Cal Poly FAST CTF Challenge 4
File: file4 https://raw.githubusercontent.com/mfput/CTF-Questions/master/ file4
Question: The flag is in there somewhere, I swear. Format: "fastctf{flag}"
Hint: This archive appears to be password protected. Maybe a certain Cat can lend a hand?
Answer: fastctf{the hashcat goes meow}
Interestingly this file contained no extension. Often CTFs will not include file extensions as an extra layer of difficulty. If you don’t know the extension to a file, the Linux “file” command is the go-to option. In this demonstration I used Cygwin, a Linux emulator for Windows.

File4 is a 7zip archive. Edit the file in Explorer and add the “.7z” extension, then right-click to extract it. If you do not have 7zip, you should, and you can download it from https://www.7-zip.org/.

When trying to extract the file, you should be treated with this image above. A password on a 7zip archive? Who knew they had that functionality. This presents a problem. However they hint helps us out. “A certain Cat can lend a hand”. Hashcat is a popular GPU-based password cracker that supports many different encryption algorithms, including 7zip archives. You can download Hashcat from https://hashcat.net/hashcat/. While Hashcat can find a matching hash, first you need to acquire the hash from the archive.
7z2hashcat is a perl script that can determine the hash of the password used to encrypt a 7zip archive. You can download 7z2hashcat from https://github.com/philsmd/7z2hashcat. There is also a Windows executable available from the releases page. Once downloaded, the usage for 7z2hashcat is very straight-forward:
7z2hashcat.exe file4.7z

This will create a very, very large hash of the file. You will then need to insert this hash into Hashcat with a good password list. To specify the 7zip archive hash, use the “m” flag with the number 11600.
hashcat64.exe -m 11600 [hash] passwords.txt

Hashcat has successfully cracked the password:12345abc. This value is also added to a potfile in the Hashcat directory. File4.7z can now be unlocked since we know the password. Once extracted, there should be one file: “flag (81).txt”. Examining the text file gives us some more information.

In this file there is some metadata, and some HTML tags, and then a large section that is base64 encoded. From what we can tell that the content-type is an image. Putting the file through the file command gives a little more information on the file type as well.

MIME (Multipurpose Internet Mail Extensions) is an internet standard that extends the HTML format to support email, non-ASCII text, and attachments like images, audio, and videos. Changing the extension to HTML would not have helped. The file is actually an MHTML file, which is an archive format that combines HTML pages with metadata and any images or other attached documents. When changed to an MHTML file it can then be opened and the flag is displayed.

Like my work? Donate here: https://buymeacoffee.com/forensicnoobsecurity
Subscribe to:
Posts (Atom)